Difference between revisions of "OS4X plugin groups"
| (7 intermediate revisions by the same user not shown) | |||
| Line 38: | Line 38: | ||
==== creating plugin group ==== | ==== creating plugin group ==== | ||
| − | In order to add a new plugin group, click on the "''Add''" button: | + | In order to add a new plugin group, click on the "''Add''" button: <i class="fa fa-plus-circle"></i> |
| − | |||
This leads you to the "''Adding plugin group''" form. You have to give the new plugin group a unique name. | This leads you to the "''Adding plugin group''" form. You have to give the new plugin group a unique name. | ||
| Line 48: | Line 47: | ||
==== editing plugin group name ==== | ==== editing plugin group name ==== | ||
| − | You may change the name of any plugin group by clicking on the "''edit''" icon | + | You may change the name of any plugin group by clicking on the "''edit''" icon <i class="fa fa-edit"></i>. The next screen asks you to change the name: |
[[Image:Edit plugingroup.png]] | [[Image:Edit plugingroup.png]] | ||
| Line 61: | Line 60: | ||
The already selected plugins are listed in a table, representing a top-down view of this group. The first executed plugin group is displayed at the top. The plugin name itself is a link to the plugin administration page. | The already selected plugins are listed in a table, representing a top-down view of this group. The first executed plugin group is displayed at the top. The plugin name itself is a link to the plugin administration page. | ||
| − | In order to add a plugin to the end of the plugin group, select the appropriate plugin from the plugin pulldown menu and submit the form by clicking on "add plugin". Plugins are removable by clicking on the "''delete plugin''" icon | + | In order to add a plugin to the end of the plugin group, select the appropriate plugin from the plugin pulldown menu and submit the form by clicking on "add plugin". Plugins are removable by clicking on the "''delete plugin''" icon <i class="fa fa-trash"></i>. |
| − | To move a selected plugin in the execution order down, click on the "''move down''" icon | + | To move a selected plugin in the execution order down, click on the "''move down''" icon <i class="fa fa-arrow-down" aria-hidden="true"></i>. To move a plugin up, click on the "''move up''" icon <i class="fa fa-arrow-up" aria-hidden="true"></i> or place it via drag&drop with the mouse. |
==== cloning plugin group ==== | ==== cloning plugin group ==== | ||
| − | In order to clone a plugin group (which is useful if you want to create a new plugin group which will contain mostly the same plugins in the same order as the original plugin group), you may click on the "''clone plugin group''" icon | + | In order to clone a plugin group (which is useful if you want to create a new plugin group which will contain mostly the same plugins in the same order as the original plugin group), you may click on the "''clone plugin group''" icon <i class="far fa-copy"></i>. The new name has to be defined in the next step: |
[[Image:Clone plugin group.png]] | [[Image:Clone plugin group.png]] | ||
| Line 72: | Line 71: | ||
==== deleting plugin group ==== | ==== deleting plugin group ==== | ||
| − | In order to delete a plugin group, click on the delete icon on the left side of the appropriate row: | + | In order to delete a plugin group, click on the delete icon on the left side of the appropriate row: <i class="fa fa-trash"></i> |
If the plugin group is configured in any partner entity (company, location, department or recipient) or basic configuration, these entities will be displayed here: | If the plugin group is configured in any partner entity (company, location, department or recipient) or basic configuration, these entities will be displayed here: | ||
Latest revision as of 13:34, 11 April 2019
Defined OS4X plugins can be grouped into plugin groups. These plugin groups can be administrated via web GUI. Configured plugin groups are available for any hierarchical level (company, location, department and recipient) to be defined for incoming and outgoing jobs.
Plugin group usage
There are three cases for plugin group using: incoming before a recipient is known, incoming jobs when a recipient is known and outgoing jobs.
Outgoing jobs
The most easiest case is the outgoing job: all job parameters are known when the job starts. In this case, a usable plugin group for sending jobs are searched. This is done in four steps:
- search for a send plugin group at the configured defined recipient
- if not found: search for a send plugin group at the configured defined recipient department
- if not found: search for a send plugin group at the configured defined recipient location
- if not found: search for a send plugin group at the configured defined recipient company
If no send plugin group is defined in any of these hierarchy levels, the job gets the status "aborted" and a log entry is added to the job (complaining about a non-configured send plugin group for that recipient).
The first found plugin group with its configuration (if any is set) is used for that outgoing job. It's processed from the first to the last plugin of that plugin group.
Incoming jobs before a recipient is known
When an incoming job starts (after all files are received for that job), the globally configured default receive plugin group will be executed. Its main goal should be defining the correct recipient (and optionally the sender; globally: interpreting the hopefully available ENGDAT abstract file).
Incoming jobs when a recipient is known
After the execution of the default receive plugin group, the recipient plugin group is searched:
- search for a receive plugin group at the configured defined recipient
- if not found: search for a receive plugin group at the configured defined recipient department
- if not found: search for a receive plugin group at the configured defined recipient location
- if not found: search for a receive plugin group at the configured defined recipient company
If no receive plugin group is defined in any of these hierarchy levels, the job gets the status "aborted" and a log entry is added to the job (complaining about a non-configured receive plugin group for that recipient).
If the default receive plugin group is also configured at recipient's side, the plugin group will not be executed a second time since addressing has been fulfilled with the first run. A log message
Same plugin group defined for 'default receive plugin group' and recipient, skipping unnecessary execution.
will be added to the plugin logs of the job.
The first found plugin group with its configuration (if any is set) is used for that incoming job. It's processed from the first to the last plugin of that plugin group.
plugin group management
listing plugin groups
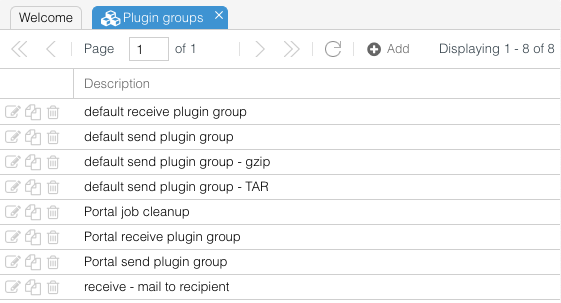
When OS4X Enterprise is installed properly (see is OS4X Enterprise installed?), the left-hand menu contains Plugin groups. Clicking on that link opens the list of configured plugins:
creating plugin group
In order to add a new plugin group, click on the "Add" button:
This leads you to the "Adding plugin group" form. You have to give the new plugin group a unique name.
After submitting the form, a new plugin group has been created and will be listed in the plugin group list.
editing plugin group name
You may change the name of any plugin group by clicking on the "edit" icon . The next screen asks you to change the name:
By submitting the form the name changes. This namechange has no influence to any configured partner since the internal ID is always used.
managing plugin group
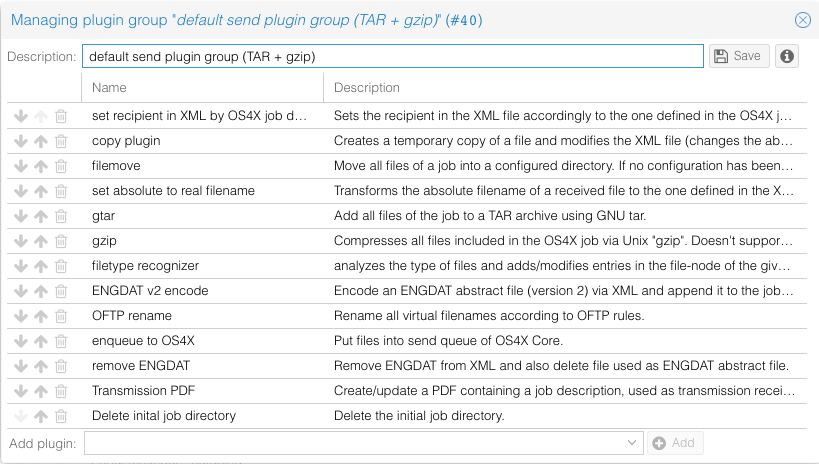
In order to manage the content of a plugin group, click on the plugin group name (this is a hyperlink) in the plugin group list. The next screen displays the content of the selected plugin group:
The already selected plugins are listed in a table, representing a top-down view of this group. The first executed plugin group is displayed at the top. The plugin name itself is a link to the plugin administration page.
In order to add a plugin to the end of the plugin group, select the appropriate plugin from the plugin pulldown menu and submit the form by clicking on "add plugin". Plugins are removable by clicking on the "delete plugin" icon . To move a selected plugin in the execution order down, click on the "move down" icon . To move a plugin up, click on the "move up" icon or place it via drag&drop with the mouse.
cloning plugin group
In order to clone a plugin group (which is useful if you want to create a new plugin group which will contain mostly the same plugins in the same order as the original plugin group), you may click on the "clone plugin group" icon . The new name has to be defined in the next step:
By submitting a new name, the existing plugin group will be cloned to the new name.
deleting plugin group
In order to delete a plugin group, click on the delete icon on the left side of the appropriate row:
If the plugin group is configured in any partner entity (company, location, department or recipient) or basic configuration, these entities will be displayed here:
By submitting the form, the plugin group will be deleted and all affected entities will receive a "no plugin group defined" configuration.


